Dealing with your RV’s black water holding is never a nice job, but the consequences of getting sloppy with your dumping schedule are far worse. You’ll be dealing with foul odors, less fuel efficiency, and possibly even overflows — no thanks!
To avoid this smelly fate, you’ll need to empty your black water holding every 3-5 days, depending on how often you’ve been using the facilities.
You’d be forgiven for thinking that if you upped your dumping schedule that you’d be doing your RV a favor, keeping things extra fresh and clean, but it’s important that you wait the three days.
If you dump too early, the bacteria in your waste tank won’t have enough time to break down the solids, which will make your job an absolute nightmare.

What About Dumping RV Gray Water Waste?
You can follow a similar rule for your RV’s gray water holding; however, it normally won’t need sprucing up quite as frequently as your black water tanks.
You’ll know it’s the perfect time to dump it once the tank reaches roughly ⅔ of the way full. Alternatively, try to keep it to once a week to allow the bacteria to work its magic on any solid food residue or debris.
What’s The Difference Between Gray And Black Water?
Simply put, black water refers to all our toilet time waste. You can think of it as a sterilized term to save us from calling it poop water, as “black water” leaves you with a much more neutral and pleasant impression.
Gray water, on the other hand, is all the other wastewater. For example, when we take a shower on the road, the water heads to the gray water tank, as does the sudsy water after we’ve finished doing the dishes.
Sensor Troubles And Black Water Waste
Purging your home on wheels of toilet waste has a few obvious benefits…getting rid of nasty odors, for instance. But there’s another reason to keep a clean shop that you may not be aware of.
The longer you leave the black water waste to stagnate and fester, the more waste residue will adhere to the walls and floor of your septic tank, and once that stuff’s on there, it can be incredibly tricky to dislodge.
If the problem persists, the residue will inevitably reach the tank sensors, which will then constantly alert you of a full tank, even if you’ve just emptied it. And if there’s one thing you don’t want to leave to guesswork, it’s the volume of your black water hold.
Keeping up with that 3–5 day dumping schedule will prevent too much of this nasty residue from sticking to the interior of the tank, keeping your sensors clean and clear.
Where Should I Dump RV Waste?
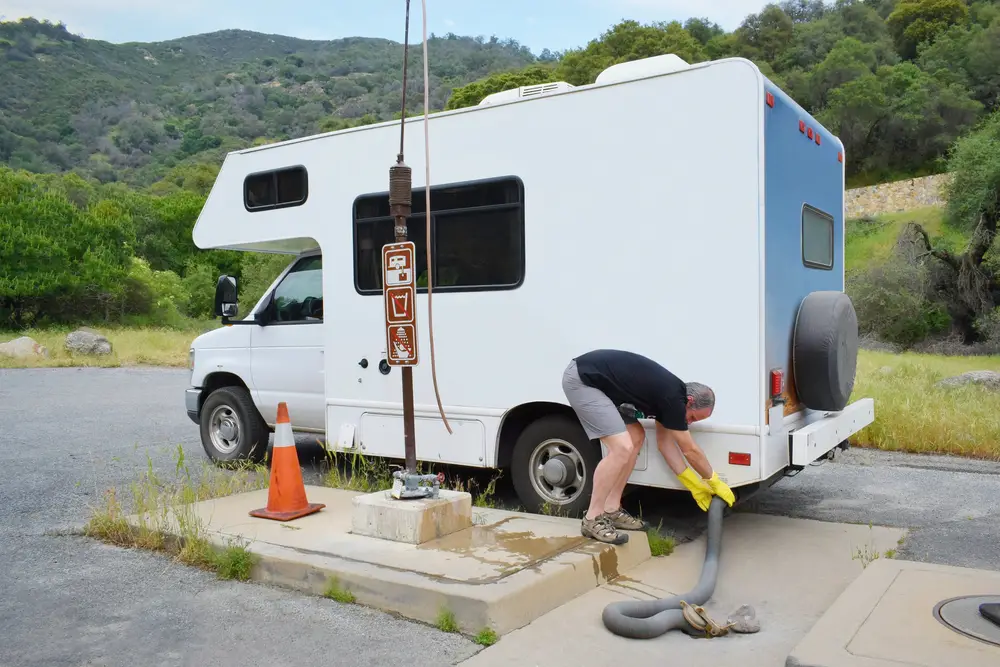
Dumping stations are the best places to get rid of all that waste sloshing around beneath your RV. They’re designed specifically for mobile home waste management, and make what can be a pretty gross job, a bit more bearable.
Black water is far more feculent than gray water and needs to be dealt with as such, but even though gray water can sometimes be used to water plants, it’s almost always illegal to dump it on the ground.
I’ve heard reports of people being given permission by forest rangers to do so from time to time, but as a general rule, it should be dumped at a dumping station along with your black water.
While some RV-ers with poor etiquette and no respect for marine ecosystems will dump directly into the sewer, it’s illegal to do so. That said, it’s perfectly legal to dump your black and gray waste into your home sewage system.
How To Dump RV Waste
Step 1. Pull up as close to the dumping station as physically possible.
Step2. Don protective gloves.
Step 3. Attach the sewer hose to the dumping station.
Step 4. Secure the other end of the sewer hose to your waste tank.
Step 5. Open the valve and let the waste run into the dumping drain.
Step 6. Rinse residual waste down with your RV’s built-in rinse system, or by filling the toilet with clean water and flushing it a couple of times.
Step 7. Shut the waste valves off, remove the hose from our RV, and lift it up, so gravity carries any leftover gross stuff into the drain.
Step 8. Rinse the area down, link the ends of the sewer pipe, and place them back into storage.
Dumping RV Waste In Your Home Sewer
While this is a possibility, I’d still highly recommend trying to find a dumping station before heading home, for a couple of reasons.
Firstly, as I’ve already touched upon, dumping stations make the job much easier and way less messy.
Secondly, your home sewer can’t handle all that much waste, so if you’ve got a lot, dumping at home is strictly out of the question.
If you’ve only accumulated a small amount of waste, you’ve got the green light to dump your goop at home, but you’re going to need a few things first.
Once you’re fully equipped, hook the macerator pump up to your waste tanks and follow the same procedures you would at a dumping station.
Side-Note – Portable macerator pumps aren’t usually compatible with your standard AC wall outlet, so you’ll have to connect it to your caravan or car battery to power it.
You may also need extension hoses, as dumping from a driveway usually means you’re further away from the waste disposal point.
RV Waste Tanks – Cleaning And Water Levels
You need two substances for keeping your RV waste facilities in tip-top shape. One is a tank cleaner for sterilization after you’ve dumped the waste, and the other is a tank treatment for breaking down solids in the wastewater itself.
Adding the right amount of water to your waste tanks after dumping and cleaning is also essential. Water helps the tank treatment along, ensuring the bacteria is robust enough to break down solids quickly.
The right amount of liquids will also form a water barrier that will combat the spreading of nasty odors, keeping your living space, well…liveable.


