Winter is coming and most motorhome caravan owners have to leave next road trip until next season. Leaving your RV for a long time over winter without the right preparation may harm it and lead to avoidable expenses before your next road trip.
In this article, we’ll go through all the RV winterization steps and show you how to prepare your caravan or motorhome for winter, what points you should pay attention to so that nothing breaks and remains in good condition until the new season!
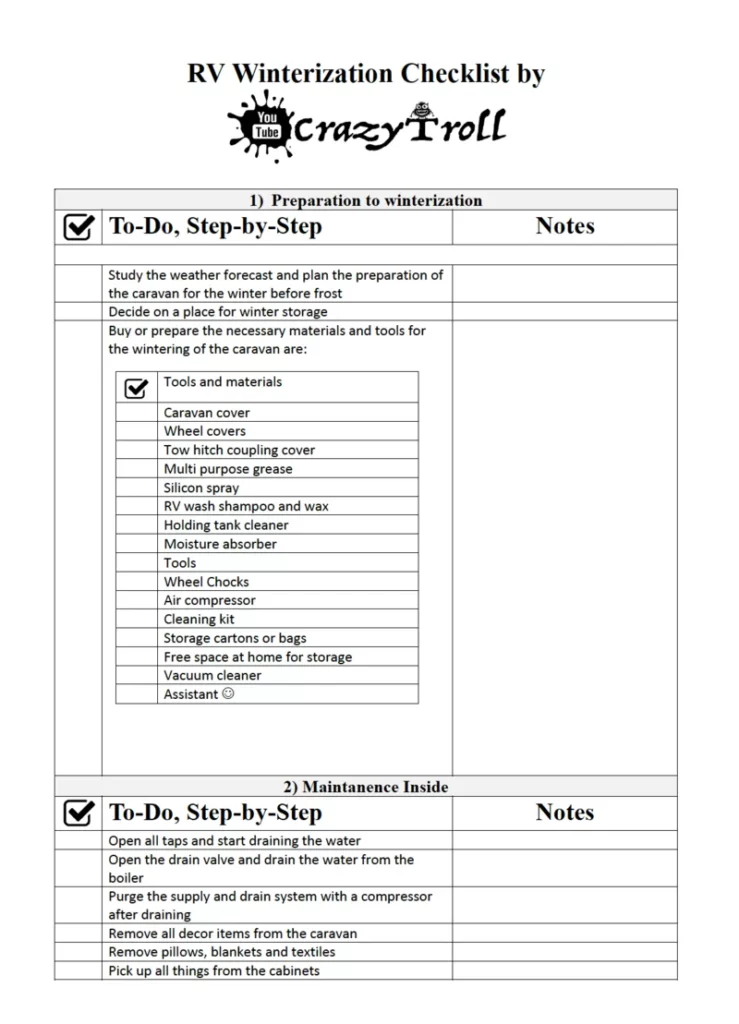
1. Place for winter
The caravan can be stored indoors or outdoors. The best possible winterization is indoors, but not everyone owns a big enough garage or is able to rent indoor winter storage for a motorhome or caravan. Often it is rather costly and eliminates access to your RV.
Find a convenient place, where it will spend the winter so that there is no strong wind or a large slope. Parking on any covered surface with asphalt, concrete, or tiles is preferable over gravel or grass. Uncovered soil produces more moisture over time, so more water will condensate on the underbelly and soak inside with air.
Ensure that you will have convenient and easy access inside and a parked RV doesn’t obstruct access to a garage or garden. It will be hard to relocate your RV once it is fully prepared for winter or after the first snow. We store the caravan near the house and the most common choice is to place your RV near your house.
2. Drain water from tanks and pipes
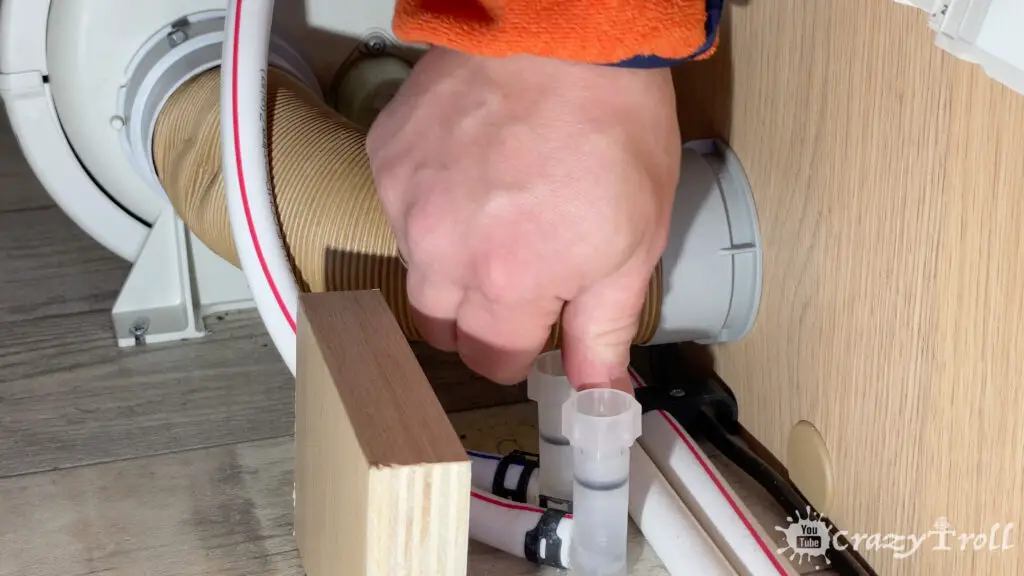
The next step in preparing for winter is to completely drain the entire water supply system including the fresh water tank and toilet flush-water tank. This will prevent the freezing of the water in pipes. Pipe cracking is one of the most common damages due to frozen water.
Water draining from pipes and heater
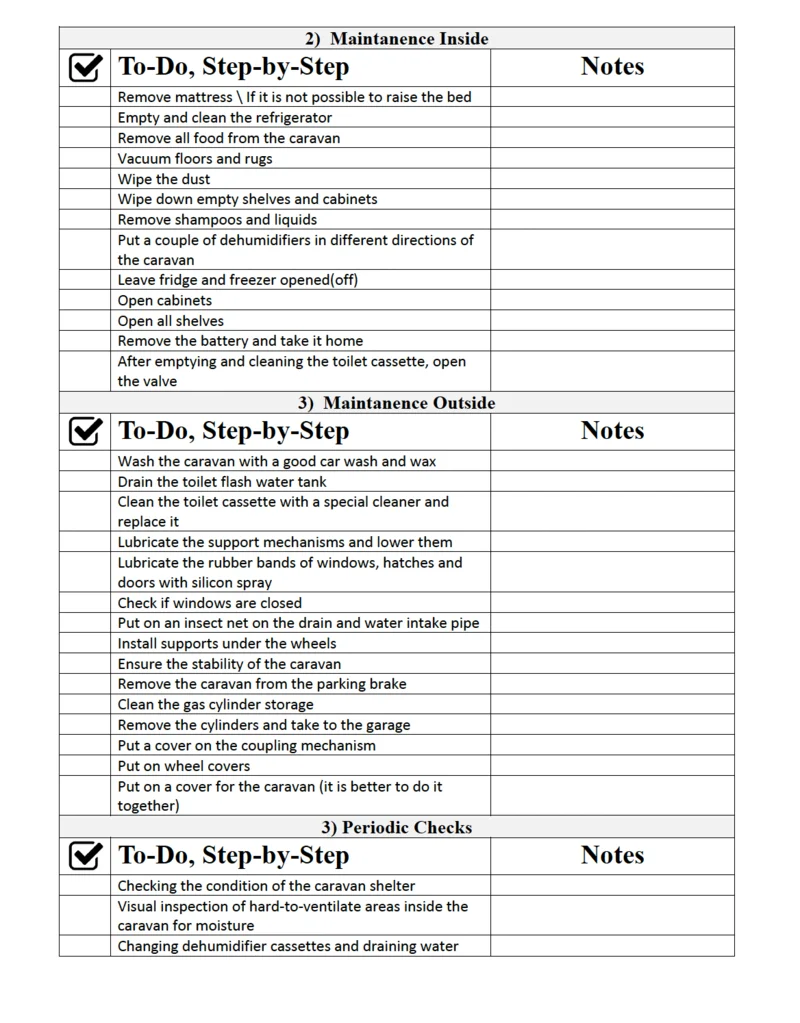
First, open all taps to empty the fresh water tank and then open the drain valve. In modern Eriba models, it drains water from both from water piper and a heater. Keeping taps open will allow you to drain water by gravity, but some water may remain in pipes.
The next step is to purge the system with a compressor, since a certain amount of water remains in the system, even after draining.
Remember to drain the toilet flush water tank. Your toilet system might be equipped with a drain valve or separate pipe. In the worst case, just flush all water into the blank tank and then empty it.
Once you are confident that your holding tank is clean and odor-free – slide it back into place and open the toilet flap so that it does not stick to its seat.
3. Remove clothes and food
Now it’s time to remove the excess from the RV. Things that were so needed in the summer only collect moisture in the winter, damp, condense, and deteriorate, spoiling what they are standing on.
Collect all pillows, bedding, and bedspreads – these are best kept at home. If there is no room at home, then place the pillows vertically in the part of the caravan where air circulation is best – all these actions are necessary to prevent the accumulation of moisture in them. It is better to remove the bed with a mattress and pillows from the camper for the winter.
Collect all clothes, towels and remove them from the caravan. Dry all cabinets and shelves well and remove all food and perishable items.
The refrigerator and freezer should be washed thoroughly. Leave the doors open to avoid unpleasant odors.
Vacuum the floor and rugs.
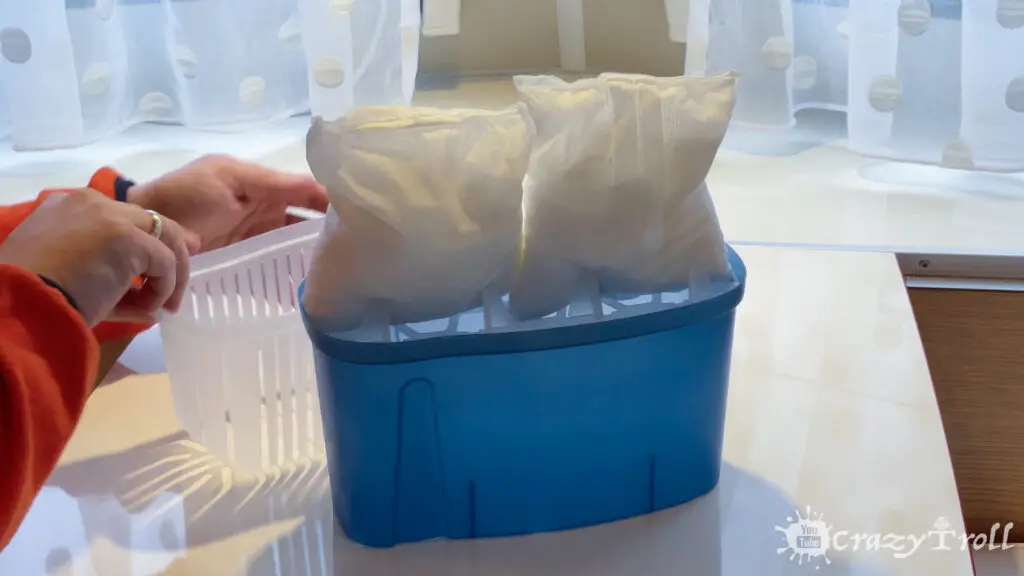
4. Place dehumidifiers
To prevent mold and mildew build-up it is important to have good control over moisture levels in your RV. Several dehumidifiers on different sides of the camper won’t be excessive. They can be placed in cabinets to prevent moisture build-up and damage caused by it.
Leave all cabinet doors open and leave the bed in the raised position. For better air circulation
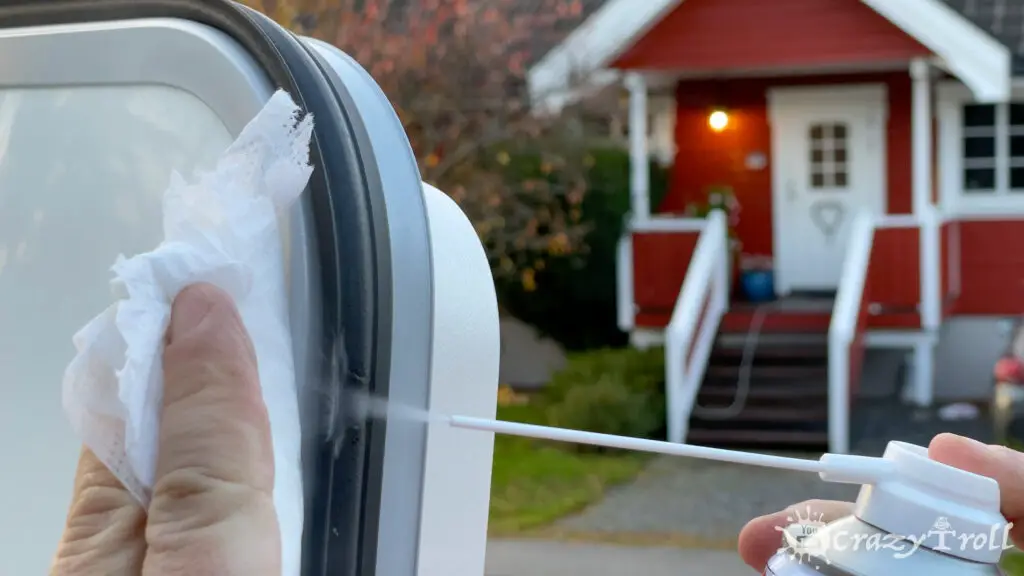
5. Lubricates window and door rubber seals
Open all windows and doors and lightly grease their rubber seals. This will prevent the windows from sticking and make them easier to open in the spring. If this is not done, then in the spring damage to the rubber seals is possible, up to rupture due to drying.
Use silicone spray to lubricate and protect plastic and rubber. Silicone spray protects rubber surfaces from freezing and hardening, as well as leaves a glossy surface that brings out the original look. It can be used all year round but is crucial before winter for aged rubber seals.
After lubrication check, if the windows with hatches are closed – it is important that insects do not get inside the caravan. But DO NOT COVER the ventilation openings, otherwise, there will be no air circulation. Air will stagnate and moisture can seriously damage your caravan.
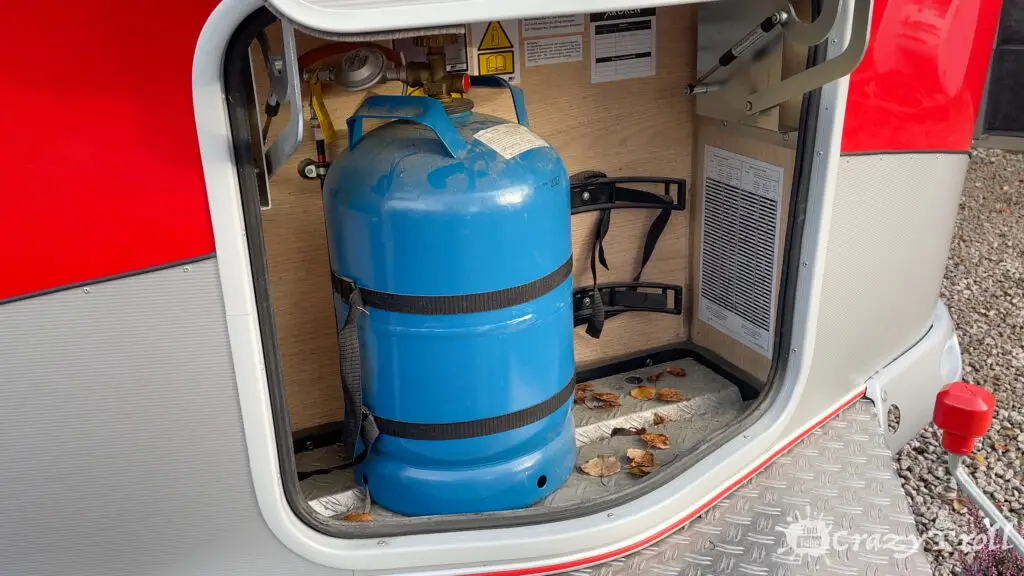
Remove the gas cylinders and store them in a ventilated area during the winter. If you do not have this, then check that the valves are securely closed and that the inside of the cylinders chamber is clean.
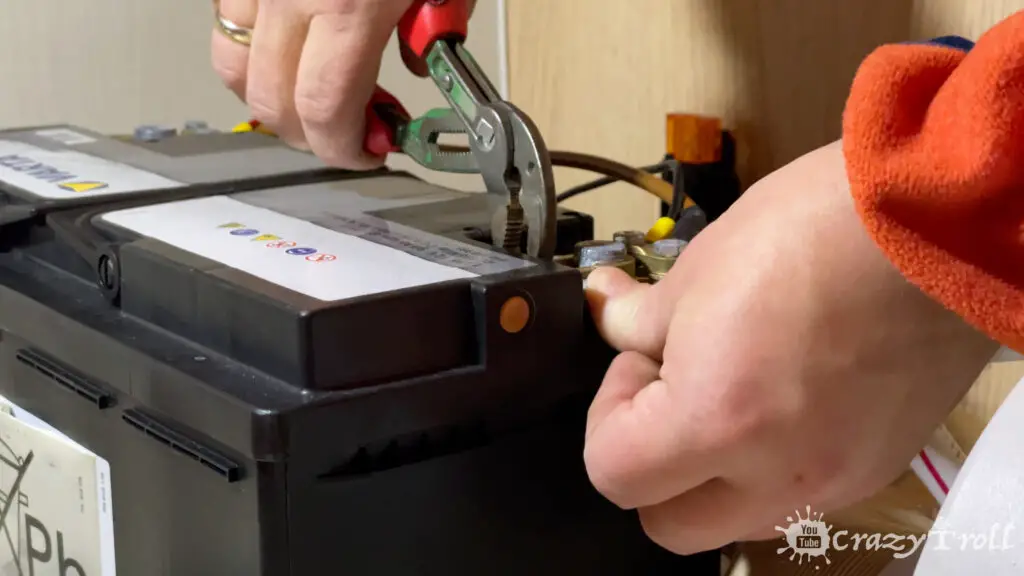
8. Disconnect battery
Remove the leisure battery and store it in a warm and dry place. Ensure that this room is well ventilated.
Use a charger to maintain sufficient battery power.
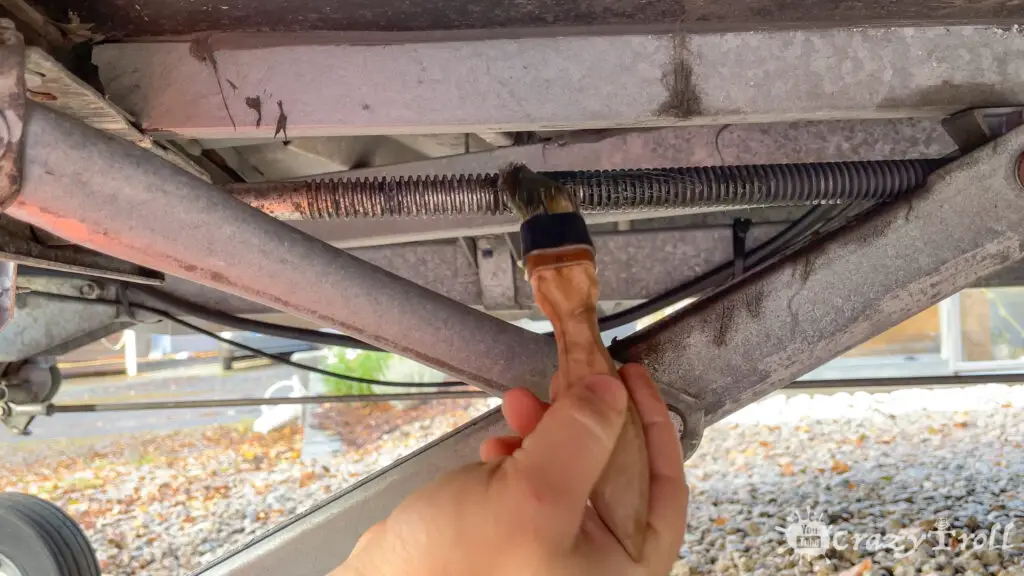
9. Grease parking supports
Lubricate the parking supports to prevent rusting in winter. Corner steadies are in use at every camping and parking at home and therefore require good lubrication and protection and not only during winterization.
Suggest using any lithium grease that you have in your workshop. AP or All-Purpose grease with good adhesive properties will fit for parking supports. If you have MP (Multi-Purpose), EP 1, or EP 2 grease – you can use it as well. All greases are water repellent, reduce friction and protect against rust and corrosion.
Proper greasing will keep dirt and water out of the equipment, extends the life of parts and equipment, and most important ease the use of steadies. Don’t forget to put them down and level your RV.
10. Release the parking brake
Place chocks under the wheels and release the parking brake – otherwise, the breaking pads may freeze or get stuck to the drums. The adjustment of the mechanism after a long stay may be violated.
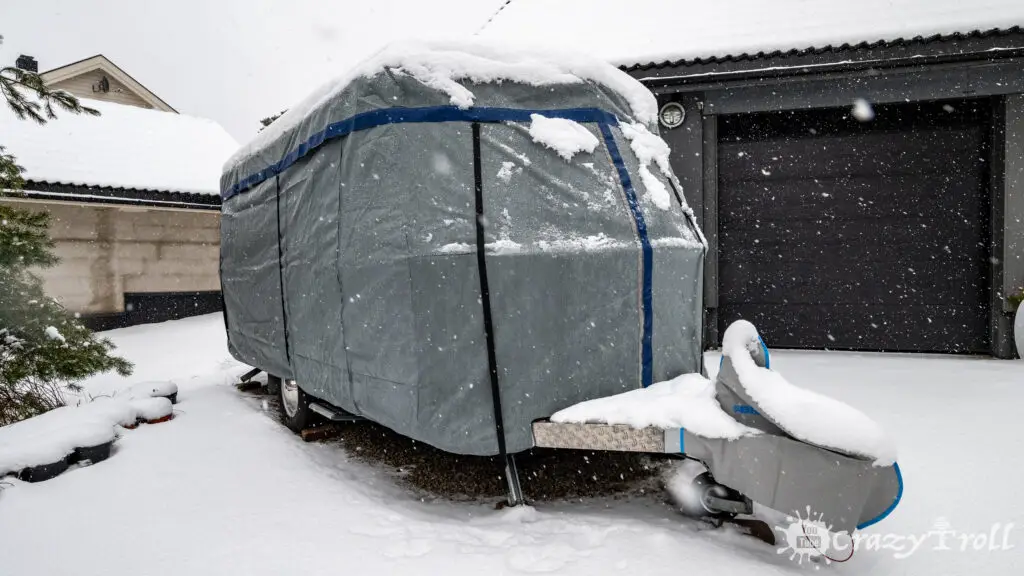
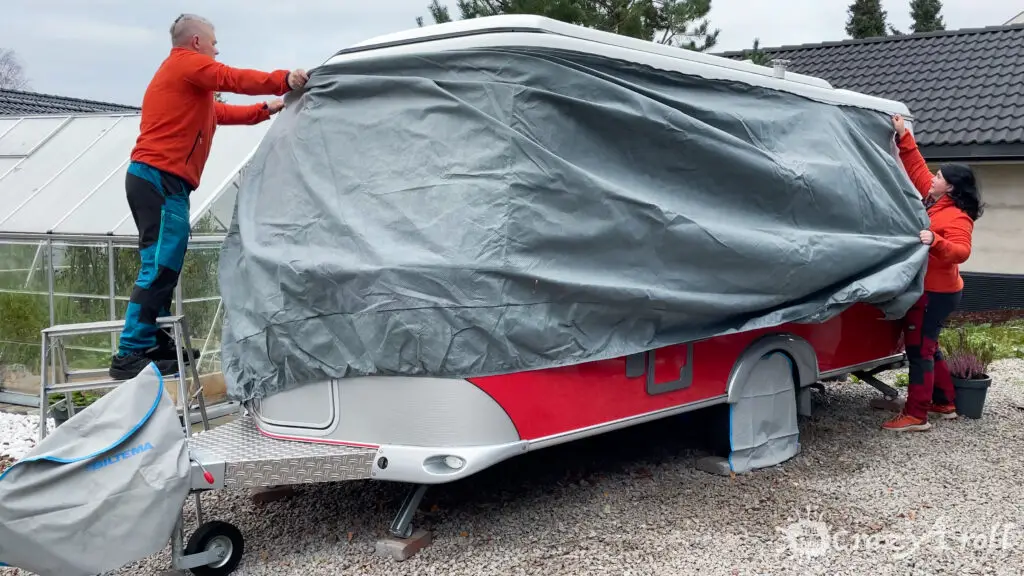
11. Cover hitch, wheeels and RV
Cover the hitch with the designated waterproof cover and the wheels too.
Cover the RV with waterproof but breathable material of the appropriate size. The most common material for covers is three-layer SFS fabric. This will protect your mobile home from rain, snow, and ice, preventing moisture from the air condensing on the surfaces.
Never use plastic or tarp to cover your caravan. Condensation and excess moisture accumulate under such a coating.
12. Periodic checks
In addition to these measures of preparation for wintering, it is necessary to periodically look into the RV during the winter and check its condition, paying particular attention to the level of humidity.
It is very important to visually inspect poorly ventilated areas and joints of materials, as well as cable joint points. In our case, the cable from the solar panel installed on the pop-top roof. To control humidity, we recommend getting a portable hygrometer to check the humidity level in the caravan yourself!
13. Use Checklist
A checklist that we made after our first winterization saved a lot of time and effort during the second winterization of the caravan. We discovered that it is easy to forget some tools, so now it includes even a toolkit list.
Feel free to advise us what we missed and we will update the checklist accordingly!
14. Watch the entire process in the video!
We have made a short video about the full process of winterization. Video may answer some of your questions if not fully covered in this article. We will be happy to hear from you if something should be added.